Laser pointers, measuring tools, medical tools, and engraving/cutting tools are just a few of their many applications. I’ve always dreamed about how cool it would be to have an engraving and cutting tool to create personalized items and gifts. That day has finally come. I was given the opportunity to review the DIY Laser Engraving Machine TS-55 and cutting machine and I jumped at the chance.
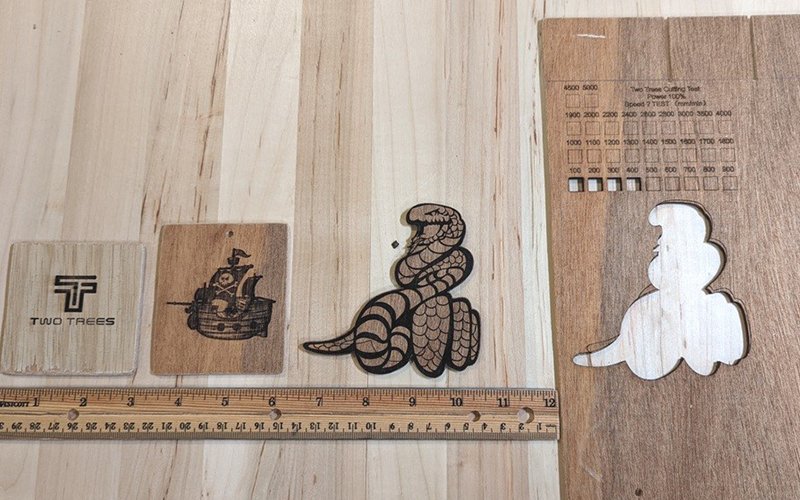
As a novice, it took some time to become familiar with the 3d laser engraving machine and the software. Using Two Trees test files, I was able to engrave and cut Kraft paper, 3 mm plywood and 2 mm leather which came out very nicely. Then suddenly, when testing on stainless steel, the laser quit working. But Two Trees laser laser machine was really helpful. After trying to troubleshoot the problem, they determined that there was something wrong with the laser and sent me another laser head. I was then able to test it on stainless steel and create some other items using 4 mm basswood and 2 mm leather. This is the most fun I’ve had with a review item in a long time!

Two Trees is a manufacturer of FDM 3D printers and DIY laser engravers and the Two Trees TTS-55 is a 5.5 W do-it-yourself (DIY) diode laser engraver and cutting machine. The TTS-55 is an upgrade from the Two Trees TTS-5.5 laser engraver; the TTS-55 has a 5.5 W laser instead of 2.5 W, and it has a 32-bit motherboard instead of 8-bit.
1. Please always wear laser safety glasses to prevent damage to your eyes when using the laser engraver (for the TTS-55 you need to have glasses that block 440-450 nm light). Two Trees provides you with some. I also purchased some FreeMascot OD 6+ 190nm-490nm Wavelength UV light / Violet & Blue Laser Safety Glasses (CE EN207 certification – European laser eyewear standards for laser safety eyewear).
2. Never leave a laser engraver/cutter unattended when it is in use – it is a potential fire hazard.
3. Protect your table by placing a sheet of metal, plywood, honeycomb laser bed, etc. under your engraving/cutting material to prevent damage to your table when using the laser engraver.
4. Use caution when engraving or cutting on reflective materials – reflected laser light can damage the laser and your eyes (some reflective objects like stainless steel can be covered with a coating to make it safe to engrave/cut; refer to the manual).Use caution when engraving or cutting on reflective materials – reflected laser light can damage the laser and your eyes (some reflective objects like stainless steel can be covered with a coating to make it safe to engrave/cut; refer to the manual).
• User manual entitled “Burn Down Eternity” (Let’s hope not!!)
• USB flash drive and TF card (contains software and sample engraving/cutting files)
• Y-axis left frame
• Y-axis right frame
• Y-axis front profile
• Y-axis back profile
• Tensioner module
• Laser head
• Motherboard and wires
• Carriage and lifting module
• X-axis beam
• Bellows holder (plastic conduit holder)
• Bellows X-axis holder (X-axis conduit holder)
Tool kit
• 8 – M5x20 screws
• 10 – M4x20 screws
• 4 – M5x10 screws
• 3 – M4x45 screws
• 4 – M3x8 screws
• Laser goggles
Power supply
• USB cable (USB-A to USB-B)
• Carved wooden board (phone holder)
• Kraft cardboard
• 4 – Footpads

Recommended materials according to the Two Trees TTS-55 website (as shown below):
Recommended materials according to the GRBL Operation Manual – Wood, bamboo, leather, plastic, fabric, paper, non-transparent acrylic, glass, and metal with surface treatment (e.g. electroplating, oxidation, other coatings).
Not recommended materials according to the GRBL Operation Manual – Some metals (such as titanium), gemstones, transparent materials, reflective materials, etc.


The Two Trees TTS-55 laser engraver comes “60% assembled” (according to Two Trees) and thus it requires some assembly. It’s easiest to assemble the TTS-55 by watching the Two Trees TTS-55 assembly video. Reading the manual to figure out how to assemble it is a bit challenging since it is translated from Chinese to English. For instance, the title of the manual is “Burn Down Eternity Laser Engraver”. Yikes!! I can’t even guess what the title is supposed to be.
Before assembling the TTS-55, here are the parts of the machine:
The above Two Trees video is excellent and shows what is involved with assembling the TTS-55. Because this video does a great job of showing how to assemble the laser engraver, I won’t go into those details.
If you decide for some insane reason to assemble the Two Trees TTS-55 laser engraver using the manual, you should know that the orientation of the machine in the first couple of figures shows the Y-axis left frame on the right-hand side of the figure and the Y-axis right frame on the left-hand side. Also, the frame pieces are not interchangeable so orientation is important.
There was one aspect of the assembly that was a little challenging. When attaching the X-axis belt to the motor, there’s very little clearance to get the belt under the gear and there’s very little slack in the belt to maneuver. When my husband and I attempted to do this, we tried to use the hook of an Allen wrench which didn’t work for us, so we somehow miraculously accomplished the task using our fingers.
My Two Trees TTS-55 laser engraver is all assembled. The frame is made from aluminum and when assembled feels pretty sturdy. The feet are made of plastic but seem stout enough.
The laser uses 5.5 W which allows it to cut up to 8 mm thick plywood according to the manual. According to the documentation, the laser has an accuracy of 0.08 mm. “The LD+FAC6+C-lens cuts a deeper depth with clearer & thinner lines and leaves fewer burning trails” (Two Trees website).
Also according to the Two Trees website, “97.3% of the 5.23W laser light is converted into the 5.09W laser spot through LD+FAC+C-lens technology” versus “only 76% of the 5.11W light from LD is efficiently converted into the focused laser spot with a working power of 3.89W” for those lasers using an LD+C lens.
The printing area is 300 mm x 300 mm, but Two Trees offers an expansion kit that increases the area to 420 mm x 400 mm.
You’ll notice that the TTS-55 has two Y-axis motors that other DIY home laser engravers often lack. This helps increase the speed and keeps the movement of the laser carriage smooth. The engraver can reach an engraving speed of 10000 mm/min (approximately 6.5 inches per second).
With the ESP32 “smart module”, the laser engraver can connect to your home WiFi thus, allowing you to wirelessly send projects from your phone or the web app.
The red plastic cover/guard on the lower portion of the laser head is magnetic and its internal funnel design helps to reduce the amount of smoke reaching the laser lens thus helping to protect it and keep it clean.
You can use the laser’s red plastic magnetic guard to help you adjust the laser’s focus by adjusting the laser head up or down until the plastic guard is nearly touching your engraving material. The screw circled in yellow above adjusts the laser head and the screw circled in red above tightens the laser head in place.
Another way to adjust the laser’s focus is by using the fixed-length column (the fixed-length column is the tiered silver cylinder shown above).
When using the fixed-length column, you adjust the laser module to each tier according to whether you are engraving or cutting.
• If you are engraving, you adjust the laser module up or down until it nearly touches the top of the fixed-length column.
• If you are cutting a 2 mm thick material, you adjust the laser module to the next lower tier.
• If you are cutting a 4 mm thick material you adjust it to the third tier down.
One thing that I noticed about the Two Trees TTS-55 laser engraver was that the scale markings on the frame do not line up with the opposite sides. On the left and right beams of the frame (shown in the red circles in the photo above), the left beam is at the “00” mark and on the opposite side, the right beam is at the “43.5” mark (the “00” doesn’t line up with the “44”). So, I’m not sure what their function is.
After the Two Trees TTS-55 laser engraver was assembled, I needed to install some software to send files to the laser engraver. In the beginning, I chose to use LaserGRBL which is free open-source software. I later started using LightBurn.
I downloaded LaserGRBL onto my laptop. I then watched a video tutorial located on the TF card provided by Two Trees called “GRBL software video tutorial.mp4”. The video takes you through plugging in the laser engraver, connecting it to your computer using the provided USB cable (USB-A to USB-B), installing the driver located on the TF card (this was not necessary for me – thank goodness because the installation file was in Chinese), and checking the Device Manager on my laptop to determine which COM port the laser engraver was using (I needed to use this info in the LaserGRBL software).
The tutorial then steps you through importing a file into LaserGRBL, setting up the parameters, and starting the engraving.
The video tutorial had no audio to describe what was happening (except for music). You were supposed to follow the cursor (which was sometimes challenging) and watch how the person used the different software required to use the TTS-55 (the driver software for the motherboard, LaserGRBL, and MKSLaser application).
I also had difficulty with this tutorial because the driver software was displayed in Chinese, the LaserGRBL software was displayed initially in Chinese and then English, the MKSLaserTool installation file was in Chinese, and the MKSLaserTool software was in English. I had to pause it several times to try to understand what they were doing. I got there eventually.
The video was pivotal in getting me started with using a DIY laser engraver and the LaserGRBL software, so it would be helpful to make another video that is completely in English.
After watching the tutorial, I launched LaserGRBL.
The screenshot above shows several boxes in different colors. In the red box above, you select the correct COM port (COM5 for me) and BAUD (select 115200 from the dropdown menu).
After selecting the correct COM port and BAUD, you then click on the lightning bolt right next to the COM/BAUD area to connect to your laser engraver – as shown in the small blue box above.
After you open a file to engrave/cut and set up the parameters you need, you can start or stop engraving by clicking on the icon shown in the small green box above (triangle Play button or square Stop button).
The black box above shows the movement controls for the laser head.
The purple box above shows the following controls from left to right: Reset, Unlock, Set Origin, Turn on Laser Light, Low Light, Moderate Light, Bright Light, Boundary (engraving/cutting area boundaries), Display Machine Parameters, Bottom Right, Bottom Left, Move to Upper Right, Upper Left, Top, Left, Right, and Bottom.
The orange box above contains the Pause (hand-inside-an-octagon icon) and Restart buttons (walking-person-inside-a-circle icon).
Before I started the engraving or cutting, I put on my laser safety glasses (ALWAYS remember to do this) and then I placed some black scrap plywood down on the surface of the table to protect it as shown above (you can use a metal sheet, cookie cooling rack, honeycomb laser bed, plywood sheet, etc.).
Next, I placed the material I wanted to engrave/cut on top of that – in this case, it was 3 mm plywood. Using the Boundary button several times, I made sure that the image being engraved/cut fit within the boundaries of the material I was using.
Note: I had difficulty accurately placing the laser in a specific location on the material I intended to engrave because the scale markings on the frame of the machine do not line up. I tried turning on the laser light to see where it was on my material, but those controls worked sporadically for me.
• It engraved and cut well (the replacement laser head worked well)
• The engravings and cuts were precise and beautiful, even really small text turned out beautifully
• Taking images and converting them into an engraving is super cool
• Customer service and technical support were very helpful and responsive
• The video tutorial on how to use the software was sometimes in Chinese and thus difficult to follow
• The MKSLaserTool install application was in Chinese so I just crossed my fingers and clicked on what I thought were typical selections to install the application
• It scale markings on the frame do not line up and thus don’t appear to have a function
• It’s not very easy to accurately engrave or cut something within specific places on your material
• It comes without an enclosure (thus, it should be used in a workshop/garage to avoid getting smoke in the house)
This laser engraving machine was so much fun to use. The engravings and cuts were precise and beautiful. I enjoyed watching the laser engraver work and I loved using it to bring my projects to life.
It cut and engraved 3 mm plywood and 2 mm leather well. When engraving on stainless steel, I needed to coat the steel with something and so I used a permanent marker to see the results. I think that the TTS-55 doesn’t actually etch the steel, but rather reacts with the coating on the metal to create a mark on top of the metal. In addition to these tests, I was also able to connect the TTS-55 to my home’s WiFi so that I could use the MKSLaser app on my phone to create engraving projects to wirelessly send to the laser engraver.
When using a laser cutter, there is a bit of a learning curve for newbies. I watched a lot of videos on how to assemble the TTS-55 and how to start engraving and cutting using LaserGRBL (open-source free software for laser engravers), LightBurn, and the MKSLaser app.
I had one major issue with the laser engraver. Somewhere along the way, the laser quit working, but the Two Trees support personnel were very helpful with this issue and sent me a new one so that I could complete my tests.
This is my only laser engraver, but if the laser head continues to work, I can definitely recommend it!
 Desktop DIY Laser Cutter TTS-5S Reviewed by Denise Bertacchi
 TS3 Laser Engraver Machines Reviewed by OverVolt
 Wood Engraving Machine TS3 Powerful 10W Enclosed Laser Marking/Engraving/Cutting Machine with Compressed Laser
 Laser Engraving Machine TT-5.5S Compact Mini Laser Engraver Wood Laser Cutter for DIY Home Use
Something isn’t Clear?
Feel free to contact us to inquire how to become the dealer or distributor, and we will be more than happy to answer all of your questions within 24-48 hours.